

I'm excited to share our powder room remodel! I've lived with the old powder room for four long years and shed nary a tear to see it demolished; in fact, it has been my favorite renovation in this house. First--with some embarrassment--I shall reveal pictures of the old powder room. Brace yourself:


With some help from my friend Kim, we decided that the makeover needed to make the bathroom look clean and fresh. We decided on white, well, just about everything. White pedestal sink, toilet (of course), white walls and trim and white and grey marble. I picked up these scones from Restoration Hardware:

Inspired by these rooms, I pondered wallpaper:


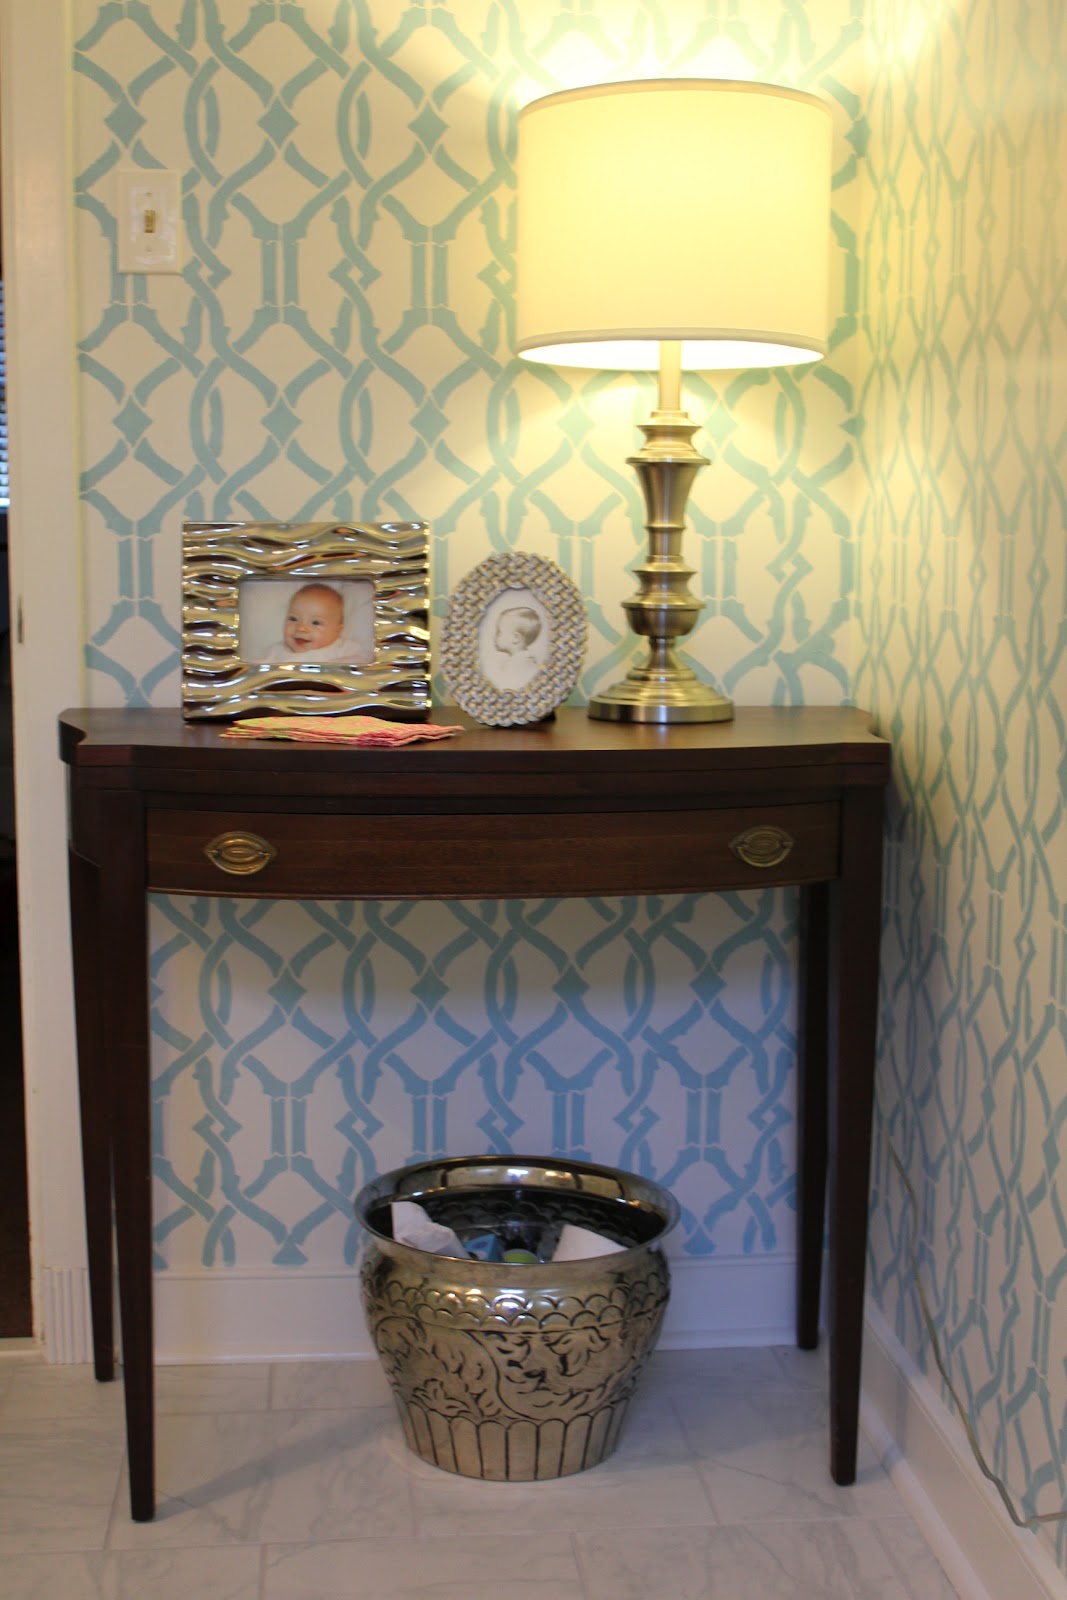
I loved the look, but the cost and trouble of putting up (and removing) wallpaper made me look to another option: stencil. I found really cool stencils from Cutting Edge Stencils. There are so many choices that I couldn't decide, so I deferred to my friend who chose the Iron Gate Stencil, pictured here:

I never would have picked this pattern though now that I've used it, I'm not sure why. It can probably be chalked-up to the fact that I don't love this color combination pictured on the website. Our contractor, Matt ( owner of The Living Wood Workshop) had begun the renovation before I even ordered the stencil, and at that point, I had no idea what color I would use.
Pictures of the renovation:

(Above: Bye-Bye 80's toilet and sink!)

(Above: Wow--layers of wallpaper and the discovery that the person who had previously done work on the home used speaker wire to wire the light fixture!)

(Above: Dated tile ceiling with water damage.)
I'd like to share with you what I did to the walls. Matt suggested painting over the existing wallpaper. He reasoned that it had been professionally hung and was in good shape without many nicks or tears and that the crown molding would cover the top area, so that painting over it would be easiest than trying to remove it. He said I would have to prime it, cut out bubbled or problem areas and then mud over (using pre-mixed joint compound) the places where I had removed the wallpaper. I had always heard that painting over wallpaper was not a good idea, but ultimately that is what I decided to do. Things, however, rarely go as planned during a renovation. After he removed the vanity and toilet, I began priming the wallpaper on the wall that had held the toilet, sink, mirror and lights; however, once I applied the Kilz, the wallpaper started to pull off in sections since there was far more damage to the wallpaper on that wall. I ended up removing the wallpaper on only that wall and leaving alone the other three.
After the wallpaper was down, I sanded and mudded (with pre-mixed join compound) the wall. I spent a lot of time on these steps, so the wall would be smooth. I also mudded and sanded the other three walls which still had wallpaper in order to repair the places where the wallpaper was not smooth. When I felt that it was as good as I could get it, I primed all four walls with white Kilz primer. I put on at least two coats on the bare wall and 3 coats on the walls with wallpaper. Then I put two coats of white ("Decorator's White" by Benjamin Moore) on all the walls. I painted Benjamin Moore Ceiling White on the ceiling. Oh, I had to prime the ceiling too.
By the time I had finished all the painting, the stencil had arrived. Now I'll give you some tips that I learned while stenciling a room using a stencil from Cutting Edge Stencils:
First, let me say that Cutting Edge Stencils does a good job of providing tips and how-to videos. Before you use one of their stencils, you should make yourself familiar with the instructional information that they've provided.
First, I primed and painted the wall's Benjamin Moore Decorator's White taking great pains with the prep work.
Second, I covered the floor with plastic drop clothes and used painter's tape to tape the plastic to the walls. I put lamps on the floor for better lighting and got all my supplies ready. I used a pan and a high -density small foam roller to roll the paint onto the stencil, and I used painter's tape to tape the stencil to the wall. The color I used for the stencil was my left-over paint from my desk project, which is Benjamin Moore Blue Rapids.
Then I began stenciling. I started on one of the least prominent walls--next to the door into the room. I used painter's tape to stick the stencils to the wall. (I wouldn't recommend a spray adhesive.) As you can see, the stencils does not go to the top of wall, that is, it doesn't butt-up against the molding. Don't worry, Cutting Edge Stencils sends an additional smaller stencils for these areas.


The project looks intimidating, and it isn't exactly easy, but it is probably not as difficult as you might think. (I will admit, that I was not a stencil novice; I had stenciled our front hall.) My stencils became crooked as I worked my way around the room, but I don't think anyone can tell. That is the beauty of a really busy stencils: people don't notice the mistakes. The stencils interlocks with itself, so there is no measuring involved!
 (Above: crooked stencil--but who can tell?!)
 Working on the corner which is the most difficult part.
So....I slowly made my way around the room. The corners are the most difficult part. On the Cutting Edge Stencils website, they show you how to do corners, but I would recommend something different. If I could go back and do this project again, I would have skipped the corners and hard to reach spots and done them last. I figured this out near the end and saved some hard to reach spaces--like behind the sink--for the end. If you save these areas, you can cut your stencil making it much smaller and easier to handle. It is difficult to bend the huge stencil into a right angle for the corners.
As they tell you on the website, you will have to wash your stencils every once in a while. This is a major pain. You must be extremely careful because the stencils can rip if you are too rough with it. You should use a cutting board or something flat to lay the stencil on when you rinse it. After I washed my stencils, I would lay it on a towel and gently blot it dry and leave it for a bit to air dry, which was a good time for a break.
 (Above: working on a corner with my stencil cut in half.)
 (Above: working with my cut stencil in the small area behind the sink.)
After I made my way completely around the room, I cut my stencil and went back to do some of the corners and hard to reach spots as shown above. Then I took the small extra stencils that I had received from Cutting Edge Stencils to do the areas close to the moldings. I don't have any pictures of the small stencil--sorry.
The small stencil certainly helped bring the pattern closer to the moldings, but it did not make the pattern touch the molding. It was always my idea to make the stencil look like wallpaper, in which case, the pattern would need to touch the moldings. So, I used a small, flat artist brush and painted these areas by hand.

 (Above: you can see where the pattern stops short of the molding under the window.)
 (Above: I used a small, flat artist brush to paint the pattern to the molding)
 (Above: my free-hand work is not perfect, but I doubt anyone using the bathroom notices!)

Here is the finished bathroom:


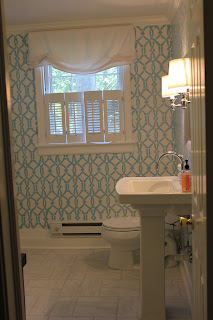


I'm not quite finished decorating though. I'd like to paint the mirror a fun color--maybe coral?--and get a cute area rug, but it's mostly finished. Phew.
Thanks for reading!
Carson
After the wallpaper was down, I sanded and mudded (with pre-mixed join compound) the wall. I spent a lot of time on these steps, so the wall would be smooth. I also mudded and sanded the other three walls which still had wallpaper in order to repair the places where the wallpaper was not smooth. When I felt that it was as good as I could get it, I primed all four walls with white Kilz primer. I put on at least two coats on the bare wall and 3 coats on the walls with wallpaper. Then I put two coats of white ("Decorator's White" by Benjamin Moore) on all the walls. I painted Benjamin Moore Ceiling White on the ceiling. Oh, I had to prime the ceiling too.
By the time I had finished all the painting, the stencil had arrived. Now I'll give you some tips that I learned while stenciling a room using a stencil from Cutting Edge Stencils:
First, let me say that Cutting Edge Stencils does a good job of providing tips and how-to videos. Before you use one of their stencils, you should make yourself familiar with the instructional information that they've provided.
First, I primed and painted the wall's Benjamin Moore Decorator's White taking great pains with the prep work.
Second, I covered the floor with plastic drop clothes and used painter's tape to tape the plastic to the walls. I put lamps on the floor for better lighting and got all my supplies ready. I used a pan and a high -density small foam roller to roll the paint onto the stencil, and I used painter's tape to tape the stencil to the wall. The color I used for the stencil was my left-over paint from my desk project, which is Benjamin Moore Blue Rapids.
Then I began stenciling. I started on one of the least prominent walls--next to the door into the room. I used painter's tape to stick the stencils to the wall. (I wouldn't recommend a spray adhesive.) As you can see, the stencils does not go to the top of wall, that is, it doesn't butt-up against the molding. Don't worry, Cutting Edge Stencils sends an additional smaller stencils for these areas.


The project looks intimidating, and it isn't exactly easy, but it is probably not as difficult as you might think. (I will admit, that I was not a stencil novice; I had stenciled our front hall.) My stencils became crooked as I worked my way around the room, but I don't think anyone can tell. That is the beauty of a really busy stencils: people don't notice the mistakes. The stencils interlocks with itself, so there is no measuring involved!


So....I slowly made my way around the room. The corners are the most difficult part. On the Cutting Edge Stencils website, they show you how to do corners, but I would recommend something different. If I could go back and do this project again, I would have skipped the corners and hard to reach spots and done them last. I figured this out near the end and saved some hard to reach spaces--like behind the sink--for the end. If you save these areas, you can cut your stencil making it much smaller and easier to handle. It is difficult to bend the huge stencil into a right angle for the corners.
As they tell you on the website, you will have to wash your stencils every once in a while. This is a major pain. You must be extremely careful because the stencils can rip if you are too rough with it. You should use a cutting board or something flat to lay the stencil on when you rinse it. After I washed my stencils, I would lay it on a towel and gently blot it dry and leave it for a bit to air dry, which was a good time for a break.


After I made my way completely around the room, I cut my stencil and went back to do some of the corners and hard to reach spots as shown above. Then I took the small extra stencils that I had received from Cutting Edge Stencils to do the areas close to the moldings. I don't have any pictures of the small stencil--sorry.
The small stencil certainly helped bring the pattern closer to the moldings, but it did not make the pattern touch the molding. It was always my idea to make the stencil look like wallpaper, in which case, the pattern would need to touch the moldings. So, I used a small, flat artist brush and painted these areas by hand.


Here is the finished bathroom:


I'm not quite finished decorating though. I'd like to paint the mirror a fun color--maybe coral?--and get a cute area rug, but it's mostly finished. Phew.
Thanks for reading!
Carson


