Showing posts with label cooking. Show all posts

Sunday, July 15, 2012

Open-Faced Maitake Mushroom Sandwich


Yesterday was my normal Saturday morning at the farmers' market.  We had planned on attending a concert that evening and taking a picnic, so I decide that I would see what looked good at the market and let availability determine the night's menu.  I came across some great looking specialty mushrooms and decided that I would make mushroom sandwiches modeled after mushroom crostini recipes that I had seen. The farmer, if you will, helped me narrow the selection to bright yellow Oyster or brown Maitake; I went with the latter after he described the flavors.  I knew I had shallots at home, so I purchased a freshly made baguette and cracked pepper goat cheese before leaving the market. Well, it rained and stormed on and off all day, and we ended up seeing a movie instead of going to our concert.  So, I made these for lunch today:

Open Face Maitake Mushroom Sandwich

Ingredients (all are approximations):
  •  3-5 TB butter
  • 1 lb Maitake mushrooms, coarsely chopped
  • 1/4 cup shallots, finely chopped
  • 2 cloves garlic, minced 
  • thyme and chives from herb garden
  • salt and pepper
  • cracked pepper goat cheese
  • fresh baguette, sliced
First, prepare all the ingredients as described above.

 Melt a few tablespoons of butter in a saute pan on medium high heat.  Cook the shallots until they begin to soften.  Add the garlic and cook for about 30 seconds. 

Then add the mushrooms.  Season generously with salt and pepper and stir  continuously. 

You will probably want to add several more tablespoons of butter at this point.   Throw in some herbs.  Cook until the mushrooms are soft.  Turn off the heat and let the mushrooms mixture sit in the pan.   Meanwhile, spread your goat cheese on top of your bread slices and toast. 

Top with mushroom mixture and serve immediately.

 Bon Appetit!
Carson


Sunday, December 4, 2011

Orange Braised Chicken Thighs with Green Olives & Bulgur Wheat with Root Vegetables


It's the time of the year when people crave stews and roasts--comfort food that warms and nourishes.  It was with this in mind that I first made this meal several nights ago; I was so pleased with the result that I'm making it again.  The Orange Braised Chicken Thighs with Green Olives comes from Epicurious and is a simple dish for two.  The Bulgur Wheat with Root Vegetables is a recipe that I concoted that is also quite simple though you will do some peeling and chopping.

Bulgur Wheat with Root Vegetables
serves 2-4 
  • an assortment of root vegetables (I used 3 carrots, 1 very large turnip and a sweet potato because that is what I had on hand.  Butternut squash is also an excellent choice.)
  • olive oil
  • salt and pepper
  • cinnamon
  • 1 cup bulgur wheat (if you have never purchased this, you can pick-it-up somewhere like Fresh Market or Whole Foods)                                                                                                                                                                       

  1. Preheat your oven to 425. 
 2.  Peel and chop your vegetables.  It would be best to try to cut the root vegetables into pieces that are similar in size.
3.  Spread the vegetables on a large, rimmed baking sheet.
4.  Pour olive oil all over the vegetables.  Then cover them generously with salt, pepper and cinnamon.

5.  Mix this together--just use your hands--so that the olive oil and spices coat the vegetables.
6.   In a saucepan, bring 1 cup of water to a boil.  Then, remove from the heat, add 1 cup of bulgur wheat and put a lid on top.  (If you don't have a lid, put something on there--like a small baking sheet--to act as a lid.

7.   Put the vegetables into the oven and roast until tender--probably about 30 minutes though it will depend on how small you diced them.
8.  When the vegetables are done cooking, scrape them into a large bowl.  Uncover the bulgur wheat and toss the two together. 

While the vegetables are roasting, start on your chicken.   I've added notes, below, in red.
Orange Braised Chicken Thighs with Green Olives
  • 4 chicken thighs with skin  (I used skinless.)
  • 2 teaspoons olive oil
  • 3 large garlic cloves, minced
  • 1 medium onion, sliced thin
  • 1/2 teaspoon ground cumin (I am currently obsessed with Smoked Paprika and substituted it.)
  • 1/2 cup fresh orange juice
  • 1 tablespoon fresh lemon juice
  • 1/3 cup small pitted green olives

Preparation

Rinse chicken and pat dry. Season chicken with salt and pepper. In a heavy skillet heat oil over moderately high heat until hot but not smoking and brown chicken, transferring as browned to a plate.
Pour off all but about 1 tablespoon fat from pan. (You won't have a lot of fat if you use skinless and you probably won't need to saute the thighs for long.)  Reduce heat to moderate and in skillet cook garlic, stirring, until it begins to turn golden. Add onion and cook, stirring, until pale golden. Stir in cumin, citrus juices, and salt and pepper to taste and add chicken and olives. 

Simmer chicken, covered, 25 minutes, or until tender.


Bon Appetit!
Carson


Tuesday, July 5, 2011

Tomato Tart and other FavoriteTomato Recipes

It's July and the farmers' market has tomatoes in abundance!  In celebration of this, I thought I would share my favorite recipes that use tomatoes as well as try a new tomato tart recipe for tonight's dinner.  


Tonight's dinner is a simplified version of the tomato tart on David Lebovitz's blog
For tarts like this, you really needn't stick closely to the recipe.  Since I'm tired and pregnant, I used a packaged pie crust and didn't measure anything.  I placed my store-bought pie crust in the tart shell and skipped ahead to step #5.   I'm sure you could use a regular pie pan if you don't have a tart shell; you won't get the tart look or be able to put as many tomatoes in the dish, though.
French Tomato Tart
One 9- or 10-inch (23-25 cm) tart
Adapted from A Culinary Journey in Gascony
Because this is ‘country-style’ fare, this tart is open to lots of interpretation. For those of you with tart dough “issues”, you can make this either free-style or in a fluted tart ring with a removable bottom. Kate didn’t let the dough rest, but simply rolled it out, transferred it into the tart ring, and ran the rolling pin over the dough to neatly shear away the edges.
If you wish to make a free-style tart, roll the dough out to about 14-inches across, then transfer it to a baking sheet lined with parchment paper or a silicon baking mat. Assemble the tart, leaving a 2-inch (5 cm) border, which you’ll then fold up to enclose the tart.
Depending on the size of your pan, you may have a bit of dough leftover. We used it to make a few mini-tartlets, which we enjoyed later than evening with our aperitifs.
Tart Filling
One unbaked tart dough (see recipe, below)
Dijon or whole-grain mustard
2-3 large ripe tomatoes
2 tablespoons olive oil
salt and freshly ground pepper
two generous tablespoons chopped fresh herbs, such as thyme, chives, chervil, or tarragon
8 ounces (250 g) fresh or slightly aged goat cheese, sliced into rounds
Optional: 1 1/2 tablespoons flavorful honey
Tart Dough
1 1/2 cups (210 g) flour
4 1/2 ounces (125 g) unsalted butter, chilled, cut into cubes
1/2 teaspoon salt
1 large egg
2-3 tablespoons cold water
1. Make the dough by mixing the flour and salt in a bowl. Add the butter and use your hands, or a pastry blender, to break in the butter until the mixture has a crumbly, cornmeal-like texture.
2. Mix the egg with 2 tablespoons of the water. Make a well in the center of the dry ingredients and add the beaten egg mixture, stirring the mixture until the dough holds together. If it’s not coming together easily, add the additional tablespoon of ice water.
3. Gather the dough into a ball and roll the dough on a lightly floured surface, adding additional flour only as necessary to keep the dough from sticking to the counter.
4. Once the dough is large enough so that it will cover the bottom of the pan and go up the sides, roll the dough around the rolling pin then unroll it over the tart pan. “Dock” the bottom of the pastry firmly with your fingertips a few times, pressing in to make indentations.
If making a freestyle tart, simply transfer the dough to a prepared baking sheet (see headnote); no need to make indentations with your fingers.
5. Preheat the oven to 425ºF (218ºC). See note.
6. Spread an even layer of mustard over the bottom of the tart dough and let it sit a few minutes to dry out.
7. Slice the tomatoes and arrange them over the mustard in a single, even layer. Drizzle the olive oil over the top.
8. Sprinkle with some chopped fresh herbs, then arrange the slices of goat cheese on top. Add some more fresh herbs, then drizzle with some honey, if using.
(If baking a free-form tart, gather the edges when you’re done, to envelope the filling.)
9. Bake the tart for 30 minutes or so, until the dough is cooked, the tomatoes are tender, and the cheese on top is nicely browned. Depending on the heat of your oven, if the cheese doesn’t brown as much as you’d like it, you might want to pass it under the broiler until it’s just right.

Pictures of my simplified tart:


 *********************************************************************************
  My mother made this tart for the first time years ago, and it is always it a hit.  My husband loves it.  It's from Better Homes and Gardens and is quite simple to make.


A tomato recipe that takes a bit of elbow grease, but makes a stunning presentation worthy of company is the mozzarella filled tomato from Bon AppetitA great first course.


In the summertime, there is nothing better than a tomato sandwich comprised of the basics:  bread, tomatoes, salt, pepper and mayonnaise.  Homemade mayonnaise, however, will take your sandwich to the next level.  Here is a very simple (five minute--if that!) recipe for homemade mayonnaise that my mother gave me:

Easy Homemade Mayo

1 egg
1/2 teaspoon Dijon mustard
1/8 tsp salt
1 TB fresh lemon juice
3/4 cup canola oil

Put first four ingredients in blender and blend until smooth.  With blender or Cuisinart running, add the canola oil.  Process until smooth and creamy.

Makes 3/4 cup.  Store in refrigerator up to 5 days.

Bon Appetit!
Carson

Monday, June 27, 2011

Penne with Roasted Vegetables, Mint and Ricotta

 
This is an easy and light dish that I like to make in the summer.  I'll apologize in advance for the fact that I do not provide precise measurements.  You don't need them--just wing-it!


INGREDIENTS
  • assorted fresh vegetables (I used: 1 zucchini, 1 Vidalia onion, 1 eggplant and 1 bunch asparagus)
  • olive oil
  • salt and pepper
  • 1 lb. whole wheat penne or other whole wheat pasta
  • fresh mint
  • ricotta
Cube the vegetables and lay them on a large cookie sheet.  Coat them with the olive oil and season with salt and pepper.  Roast on 425 until soft.  The cook time will depend on how crowded the vegetables are on the cookie sheet and how small you cubed them.  I roasted these for about 40 minutes.

Cooke the pasta al dente.  I don't always serve the pasta warm--sometimes it is room temperature.  It is good either way.  In fact, during the hot summer months, you might prefer that it not be piping hot.

Drain the pasta and put it back into the pot in which you cooked it.  Mix in the roasted vegetables and the mint.  Add more olive oil and/or salt and pepper to your liking.  Plate it.  Put a dollop of ricotta on the top.  Voila.  An easy and healthy way to utilize your farmers' market vegetables.  This dish serves 3-4 people.


Bon Appetit!

Carson

Saturday, February 5, 2011

My FAVORITE Chicken Wings Recipe

My husband loves when I make these wings; he thinks they are the best.  Even if you don't think they deserve this superlative, you are bound to think they are really good!

I've made these for the Super Bowl for about 5 years now.  They are simple, and I always bake them instead of frying them (see step #2), because I don't have a deep fryer and baking them is just easier.


I've made them with and without the seeds.  If you don't have the seeds, just use ground cumin and coriander and guess the amount.  (I'm sure you can find the equivalent online, but you'll probably do fine just taking a guess!)

Ingredients

  1. 10 pounds chicken wings, split
  2. 1/4 cup coriander seeds, crushed
  3. 1 teaspoon cumin seeds, crushed
  4. 1 teaspoon cinnamon
  5. 2 tablespoons kosher salt
  6. 1/4 cup extra-virgin olive oil
  7. 3/4 cup Sriracha chile sauce
  8. 1 1/2 sticks (12 tablespoons) unsalted butter, melted
  9. 1/2 cup chopped cilantro
  10. Finely grated zest and juice of 3 limes
  11. 3 quarts vegetable oil, for frying

Directions

  1. In a very large bowl, toss the wings with the coriander and cumin seeds, cinnamon, kosher salt and olive oil. Cover and refrigerate for at least 4 hours or overnight.
  2. Preheat the oven to 375°. Spread the wings on 3 large rimmed baking sheets and roast for about 30 minutes, until firm but not cooked through. (At this point, if you don't want to fry the wings, you can roast them for 1 hour longer, until crispy and golden.) Wash out the bowl. Add the Sriracha, butter, cilantro, lime zest and juice.
  3. In a deep fryer or a very large saucepan, heat the vegetable oil to 375°.
  4. Fry the wings in 4 or 5 batches until golden and crisp, about 5 minutes per batch; drain, shaking off the excess oil. As each batch is finished, add the wings to the sauce and toss well. Transfer the wings to a platter, leaving the sauce in the bowl for the remaining batches. Serve hot.

Enjoy!
xo-Carson

Thursday, January 27, 2011

Winter Greens Salad with Sugared Walnuts, Crispy Pears and Pomegranate


For Christmas my mother-in-law gave me the cookbook, Clean Food by Terry Walters.  I haven't read it page-for-page, but I've read enough to know it is chocked full of good information and ingredients. In the introduction, she illustrates how processing food changes its nutritional value using oats as the example listing the foods from least processed to most processed and most  nutritious to  least nutritious, respectively.

Most Nutritious: Whole Wheat Groats--Steel Cut Oats--Rolled Oats--Quick Cooking Oat--Instant Oatmeal--Cold Cereal :Least Nutritious.  She also, in Michael Pollan style, gives some food rules to eating healthy (pg. 7):
EAT
All the Colors of the Rainbow
All Five Tastes
A Varied Diet
Locally Grown, Seasonal Foods
Enjoy Your Food and Mealtime

Throughout the introduction, she discusses which foods have the highest nutritional value and presents an interesting section on journaling what one eats in an attempt to see how the food one consumes affects energy levels and how one feels during different times of the day.

I've made a few of the recipes, but especially like the
Winter Greens Salad with Sugared Walnuts, Crispy Pears and Pomegranate
Though the recipe doesn't call for Blue Cheese definitely add some Blue Cheese, Stilton or Gorgonzola!

Even if you are not into "health food" so to speak, this is a really good salad!  Let me know what you think if you end up trying it!
xo-
Carson

Sunday, January 23, 2011

Better Than The Pizza Parlour Pizza

My family eats homemade pizza just about every weekend.  It is incredibly easy to make.  I realize this post is long and the recipe may look complicated.  It is not.  This wordy post is an attempt to thoroughly explain the process for those who are making homemade pizza, and crust, for the first time.  If you make your own pizza and crust, I promise you will never want to eat or pay for delivery pizza again! 

I have a good friend, Gina, who is an expert bread-maker and DIYer, so I have incorporated some of her tips into my recipe.


Better Than The Pizza Parlor Pizza

Ingredients for Crust:
3 cups flour
1 package rapid rise yeast
3/4 teaspoon salt
2 TB olive oil
1 cup water

Ingredients for the pizza toppings:
(These depend, of course, on what type of pizza you'd like.  Here is what I'm using tonight, which is solely based on what is in my refrigerator!)
garlic
olive oil
oil-packed sun dried tomatoes
spinach
mozzarella
goat cheese

Other items you'll need for this version of the recipe, but are not all required to make a good pizza:
Saran Wrap
Large Metal Bowl
Food Processor/Cuisinart
Pizza Stone
Parchment Paper
Large, flat cookie sheet
cast-iron skillet and ice


1. I use the recipe from the Fleischmann's Yeast website called Food Processor Pizza Dough:
http://www.breadworld.com/Recipe.aspx?id=146
Follow the recipe exactly.  It's very simple; you simply mix everything in the food processor.  When I make the dough, I always seem to add a bit more water.  You want your dough to tacky, but not so sticky that you can't get it off of your hands.


2.  Coat a metal bowl in cooking spray and drop the dough into it.  Spray a long piece of Saran Wrap with cooking spray and completely cover the dough.   Let rise in a warm place.  I put my bowl on top of the stove and turn the vent lights on, which gets it nice and warm.  Let rise at least 40 minutes, but I usually let the dough rise for over an hour.


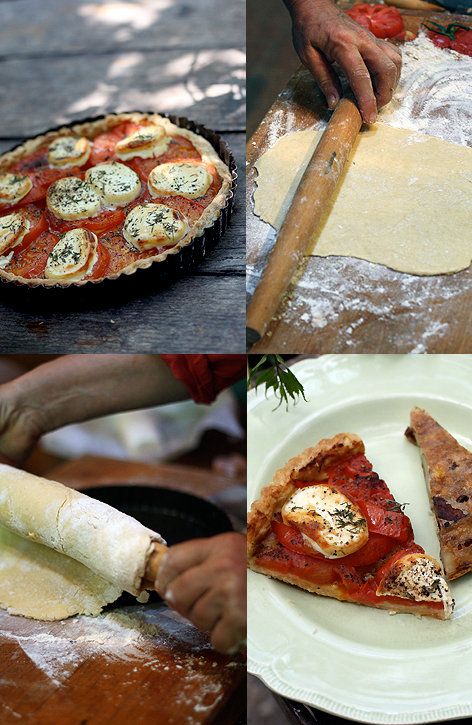
3.  After 40 minutes....Your dough should be ready.  Turn, on your oven as high as it will go.  (Gina informed me that this is the key to making good pizza.  Apparently, there are websites dedicating to breaking one's oven code in order to make home ovens reach insane temperatures.  I haven't done anything that extreme, but can get my oven to 525, which normally means a tremendous amount of smoke as it desperately needs to be cleaned!)  Now turn out the dough.  You'll want to handle it the least amount possible.  Plop it down in the middle of a large piece of parchment and shape into a circle.  Put your pizza stone in the oven and make sure it heats up with the oven!


TIP: I find one problem with homemade pizzas is that they are soggy.  This is in part due to the crust and the oven not being set high enough, but also to watery vegetables and too much pizza sauce.  I do not use marinara sauce, but instead use olive oil and garlic.  Okay, I used marinara once recently, but used it sparingly.

4.  Then add your toppings starting with your olive oil and garlic.  I usually put spinach down next, followed by onions and ending with cheese, of course.

5.  Tonight I'm trying something new with the crust.  Gina also told me that when making homemade bread, she puts a cast-iron skillet full of ice under the bread, which gives in a nice crust, so I'm going to try that with my pizza crust.  Put your cast-iron skillet on the bottom rack and your pizza stone should be on the upper.

6.   Lift the parchment paper (or slide the parchment paper onto the cookies sheet) and place it on the pizza stone.  To be clear, your pizza does not touch the pizza stone; the parchment serves as a barrier between the two.

7.  Cook on high heat for about 20 minutes.  Actually, I have no idea how long to tell you; it will depend on your oven temperature.  Periodically check on it and lift the edge of the pizza so you can tell how the crust it cooking.

Voila!  Your made from scratch pizza is less expensive, better tasting and healthier than any delivery pizza you could order.  Now pour yourself a large glass of vino and enjoy!

xo-
Carson

Sweet Cherry Tart

We have friends coming for dinner tonight and are keeping it casual.  Yesterday, I met a friend for lunch at Whole Foods, and I decided that I would grab some puff pastry and some fruit to create a dessert.  I hadn't put any thought into the dessert--this was a last minute dinner--and didn't want to have to go to the store again today.  I ended up with 2 pounds of sweet cherries and was sort-of dumbfounded as to why I had chosen them.  They were out of season which meant they were expensive b/c they were imported from Chili.  I always try to buy in season and local, so again, I'm not sure why I did this.  If I had to surmise, I would think that it had to do with the fact that my three-year-old was with me and the store was packed because it was lunch time.  Nevertheless, here is the recipe I concocted. It would be better in the summer time when there is an abundance of fresh, seasonal fruit; any fruit could be used in the place of the cherries and any jam could replace the cherry preserves. Again any measurements listed are guesses!:


Sweet Cherry Tart
Serves 4-6
Takes about 30 minutes to make


Ingredients:
2 lbs sweet cherries, seeded
1 8 oz package cream cheese
1 sheet of puff pastry (2 usually come in a package)
4 TB confectioner's sugar
4 TB cherry preserves
1 TB Chambord (optional)

Before you make the tart: Thaw puff pastry on counter (this won't take but about an hour).  Also leave the cream cheese on the counter so it can soften.

Unfold the pastry onto a baking sheet and use a rolling pin and roll a bit thinner into a square or rectangle.  Use a knife and cut about 1/2-1 inch from each side of the pastry.  Don't pick up the piece you cut off, but flip it onto the pastry.  Repeat this on each side and you'll have a little ridge or crust all the way around the tart.  Cover with foil and put baking beans on it.*  And cook on 375 for about 20 minutes--this is not precise.  Keep an eye on it and remove it from the oven when it is nicely browned.  Oh, and most people beat egg white and a little water and spread it on top.  I forgot and skipped this step, but it will keep your pastry from becoming too brown.  What can I say?  I'm a lazy cook these days.

While the pastry is cooking: 

Mix about 4 TB cherry preserves with 1 TB or so Chambord--set aside.

With an electric mixer, beat cream cheese wtih 4 TB (or more to get the sweetness you desire) of confectioner's sugar into the cream cheese.

Remove tart from heat and let cool.  Put dollops of the cream cheese all over the tart and then try to spread the dollops together to make a nice layer.  Then spread the preserve mixture on top of that.  Finally, put your pitted cherries all over the tart.

Voila!  You're done.  Simple, right?  Certainly better for summer time, but it will do!

*(When I used the beans in this way, it didn't work.   The beans are supposed to hold down the pastry so it doesn't inflate like a balloon, but my beans were puny.  I pulled the cookie sheet from the oven and used a clean dish towel to push down the pastry and deflate it.  This worked fine.  The middle was still not quit done so I put it back in at 400 for 5 or so minutes.

Saturday, January 15, 2011

Shrimp and Bulgur Wheat One-Dish Supper

Here's an easy dinner that takes under 30 minutes.  If you've read this blog, you already know that I don't like to measure things, so I'm afraid I won't give you much in the way of measurements, but it doesn't matter, the dish will still turn-out great!  (Any measurements given are guesses!)

Carson's Shrimp and Bulgur Wheat One-Dish Supper
Serves 2*


Ingredients:
  • 1/2 lb steamed and peeled shrimp
  • 1/2 bag or 1 bunch fresh spinach
  • handful of olives
  • handful of sun dried tomatoes in oil OR fresh cherry tomatoes in the summer (you shouldn't be eating the tomato-like food that is produced in the winter!)
  • 3/4 cup bulgur wheat
  • feta
Directions:
  • Put 3/4 cup of water in a sauce pan.  Heat on high until it boil.  Remove from heat, pour in 3/4 cup bulgar wheat, stir, cover and let sit for 30 minutes.


  •  On one large cutting board, chop the olives, shrimp and tomatoes reserving the oils on the cutting board.
  • Once bulgar wheat is ready, stir in the olives, tomatoes, shrimp and oil.  Make sure to get all the oil off of the board.  Then stir in the spinach.  Taste and see if you need to add some olive oil.  It should have enough oil from the olives and tomatoes.

  • Put into bowl and sprinkle the top with feta.

*You can easily adapt this recipe to feed more people--just put more of everything into the pot.  Bulgar wheat is always made with equal ratios of water to wheat, e.g: 1 cup water=1 cup wheat, 1/2 cup water= 1/2 cup wheat.