Showing posts with label re-covering. Show all posts

Friday, July 26, 2013

How to Make an Upholstered Stool (From an Accent Table)


This is a project that can easily be completed in an afternoon.  In fact, on a whim I decided to convert this stool to an accent table and was lucky enough to have all the supplies on hand!

The accent table was from my husband's grandfather's house.  When we first acquired it, I simply spray painted it white though quickly grew bored of that.  You can read the post here.


Here is what I did to transform this accent table to an upholstered stool:

Supplies:
spray paint
less than 1/2 yard fabric
grosgrain ribbon (probably about a yard)
decorative nail heads
foam
paper for tracing top of table
scissors
staple gun and staples
glue gun and glue or just regular glue


1) Spray paint your piece.  Make sure to turn it upside down and get all angles.  Make sure to apply thin layers and allow ample drying time between each.  Depending on where you live, this time of year can be difficult because of the humidity.


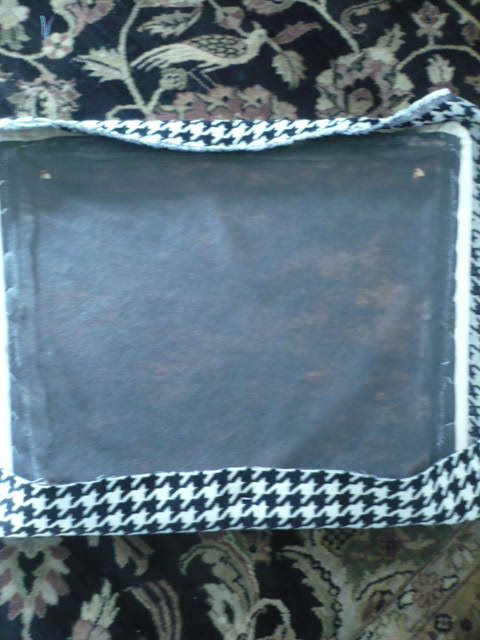
2)  Turn over your stool onto a piece of paper and trace the top.  Add about an inch all the way around the pattern.  (I forgot to do this!  Mine still turned-out okay, but it would have been better with additional padding.)  I used three inch foam.  I pinned the pattern to the foam, then cut out the foam with scissors.


3)  Glue the foam to the top of the table and let dry.  (I used a glue gun.)


4)  Lay your fabric face-down on the floor.  Center the stool top (that is, have the stool upside down) atop the fabric.   Trim your fabric so that it is about 5 inches wider than your stool top.  Fold the fabric up to cover the foam and staple it under the table top.  Do this on each side.  Pay attention to the tension of the fabric and how it compress the foam.  Play with the fabric and folding it at the corners until you get it the way you'd like it to look.  Once you have the fabric a tight as you'd like it, add staples under the stool/table top.


5) I decided to add grosgrain trim and nail heads.  After selecting a trim color,  I used the glue gun to glue the trim to the fabric.  Once that tried, I hammered the nail heads in; it takes a bit of practice to nail them in a straight line.


6) Voila!  The finished product:


Thanks for reading!
Carson

Wednesday, September 21, 2011

How to Reupholster a Stool


Earlier this year, I posted about two cross-bar stools.  At the time, I spray painted the legs black, but knew that I eventually wanted to recover them.  I am embarrassed to say that I never finished the post; therefore, I started where I had left-off finishing this project just prior to the birth of baby #2.  Though that was 6 weeks ago, I'm just getting around to publishing the post.
________________________________________________________________

My sister-in-law, who is an interior designer/owner of Kathryn Robertson, suggested that I get cross bar stools to put in front of my fireplace.  What a great idea!  Only....I could not find affordable upholstered stools.

I felt confident that I could find an alternative and found great stools for $60 each at Sears/Kmart. 
Not a bad deal!  I never liked the cherry finish, so I spray-painted them with high-gloss black Krylon spraypoint.  (Sorry-I deleted pictures of the stool!)

About two months ago, I was at U-Fab and spotted the perfect fabric for these stools, which I purchased, but they remained uncovered until last week.  In an effort to distract myself from the impending birth of baby #2, I decided to bite the bullet and recover the stools.  The process ended up being easier than I thought:

As with any reupholstry project, begin by deconstructing the furniture noting how the piece was put together.  Taking pictures is a good idea for helping you remember how to re-assemble the piece.

First, I removed the legs, then I removed the black fabric that lined the bottom of the stools.


Next, I used scissors and pliers to remove the leopard fabric.  The original stools were tufted, and when I began the reupholstry project, I thought I would tuft my stools, but ended-up deciding again it.  If your stools are tufted, pay careful attention to how the buttons are attached to the bottom of the stool.


 I tried to remove as much of the fabric and staples as I could, but it was difficult to get it all.
Next, I cut my two yards of fabric into two, one-yard pieces.  I centered the foam wrapped frame on top of the fabric (upside down) being sure to line-up the pattern--just eyeballing it.

Next I stapled a center staple on all for sides making sure to fabric had equal tension on all sides and that the pattern was straight.  Next, I added many staples to the sides until I got near the corners.

Decide how you want your fabric to fold at the corners--play around with it a bit--then pick a method for folding.  Use the same method for folding on every corner.


Be sure to cut back the fabric so that is doesn't cover the holes where you will re-attach the legs of the stool:

This project didn't take too long since I decided not to tuft the stools.

Here are the before and after stools pictured together:

After:


Thanks for reading!
Carson


Saturday, January 15, 2011

Recovering Dining Room Chairs

It's Saturday and my three-year-old is still sick.  I'm sorry for him, but am happy that all he can do is watch TV so I can tackle so DIY projects that would be difficult (and dangerous) if he were hanging around.

Today, I'm finishing recovering my dining room chairs.  While this may seem an intimidating project, it is not difficult especially if you follow my example of never measuring anything!

First, you'll want to turn over your dining room chair and remove the seat with either a screwdriver or electric drill.

Next, you'll want to remove any old fabric that you do not want.  These chairs were my grandmother's and at some point, she recovered them with this striped burgundy material.  (I'm guessing in the 80s.)  Under that material is the original cream material.  I'm removing the striped fabric and leaving the original material on the seat cover because I don't want to deal with the batting an foam; its just easier that way.


Cut your fabric so that it is a bit bigger than the seat cover.  You don't need to measure just put the seat over the fabric and cut.  However, if you have a pattern and want to match the patterns, you'll need to be more careful about where you cut.  Sometimes centering the pattern is the best best.  I am using two different fabrics (1 fabric on two chairs, and the other fabric on the other two.)  My fabrics are small, repeat patterns, so I don't feel the chairs need to match each other, but with something like a large damask or floral print, you'll want to center the pattern and have your chairs match.

Place the right side of the fabric on the floor and put the right side of you seat cover on top of it.  (You'll be looking at the wrong side of your fabric and the underside of your seat.)

Line up your fabric for the first staple and consider how it will look from the front (once done.)  Make your first staple in top middle of the seat.   Then pull the fabric at the bottom taut--but not too tight or your seat cushion will look lumpy--and make your second staple in the bottom middle.  Now your fabric is secure and the rest will be easy.


As for the corners, I'm sure there are several different ways to do this.  For these chairs, I'm making two folds on either side of the corner..  Play around and see which way you like the fabric to fold at the corner:


Make sure that you do not cover the holes where the seat will need to be screwed back into the chairs:

Staple the rest of the fabric to the chair trimming extra fabric as you go.  I wouldn't worry too much about how the bottom look as most people--with the exception of children crawling on the floor--will not be seeing it.

Voila!  New updated fabric on my dining room chairs!