Showing posts with label nursery. Show all posts
Showing posts with label nursery. Show all posts
Saturday, July 9, 2011
Painting an Antique Dresser for the Nursery (and Mirror)
The latest project to have taken over our house is work on the nursery. (I'm expecting #2--a girl!--in August.)
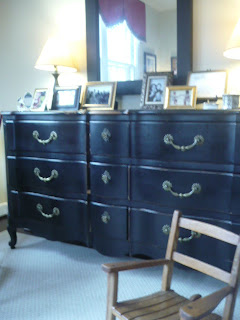
The dresser came from my husband's grandparents' house. It is the perfect size and height to work as a changing table/dresser. I decided to paint it white. (Pregnant friends: please do not purchase a "changing table" for your child. Simply buy a dresser new or used and attach a changing pad to the top. It will look better and is probably better made than the changing tables marketed by the baby/pregnancy industry!)
PAINTING THE DRESSER
First, remove all the drawers and hardware. Then, I lighted sanded the dresser and used a Swifer wipe to clean the surface followed by baby wipes. Let dry.
Once it was dry, I applied the first coat of paint. It took four coats of semi-gloss white "trim" paint (from Benjamin Moore) to cover the dresser. Fortunately, I already had several cans of leftover trim paint, so I didn't need to purchase it. Note: This dresser already had a slick or sealed surface, which is why I did not prime it. If you are painting unfinished wood or a piece that isn't very "slick", be sure to prime.)
I spent several days painting the dresser without the drawers then did the drawers separately at a later date though using the same process. Remember to remove the hardware (pulls) from the dresser before painting.
Hint: It is always better to do more light coats than fewer heavy coats. The coats will dry more quickly and the paint will be less likely to run. Always, check your work after you apply a coat and use your brush to wipe away and smooth-out any runs or drips.
After I finished painting my dresser, I noticed that the inside of the drawers were in bad shape. I cleaned them out and put one light coat of paint (same as the wall color in the nursery Benjamin Moore OC-136 "Celery Salt.") I will likely line the drawers with scented drawer liners as well. During my last pregnancy, I purchased these at Crabtree and Evelyn.
As a final step, I replaced the wooden knobs with Lucite knobs from Lowe's. These affordable pulls ($6.92) were featured in the most recent issue of House Beautiful "101 Things From the Hardware Store" (thanks for the reminder Kim!).
I am very pleased with the end result!
The mirror above the dresser is a bit of a DIY project albeit very simple. I purchased the mirror from HomeGoods, and it was rather beat-up. I decided to paint the geometric border green. All it took was two coats of acrylic craft paint and voila!
Thanks to my friends and family, I have many hand-me-down and new baby girl clothes that have filled the dresser!
xo-
Carson
Thursday, January 13, 2011
W.'s Nursery and Big Boy Room
We moved--only 3 miles--when my son was 1 year old, but it was a disappointment to leave the nursery that I had poured my heart and soul into creating for him. I had designed the nursery to look not like a typical nursery because I wanted it to become a big boy room without re-decorating. I tried to re-create the same nursery at our new house; I'm pretty happy with it though some of the furniture doesn't fit as well because we purchased it specifically for our old house. Here are the pictures from the magazine room that I used as my template, our old house, our new house with descriptions of all the DIY elements:
Here is the picture from Better Homes & Gardens that I used as my designer template:


Here are the pictures from W.'s original nursery:
Okay, I was just beginning my path as a DIYer back then, and I hate to admit that I BOUGHT, yes bought when I could have easily done this myself, this beautiful dresser. I know better now!

You DIYers will LOVE this. Once upon a time, I was betrothed to another other than my husband. When the first engagement was called off, I had already purchased my dress. It hung in my closet for years. I was working on the window treatments for the nursery and wondering what I should do for a bed-skirt and, "ah-ha!" I remembered my dress. I cute it up and attached to a rectangular square and Voila, a lovely bed- skirt!


For W's original nursery, I bought than I ever would now, that is, now that I'm a seasoned DIYer. I purchased the dresser, crib and rug new.
Here are the DIY elements:
Here is W.'s room at our new house. I tried to keep the same look. The most difficult project was that I saved the curtains from our first house and added a third swag so they would fit the new room. I was shocked that I actually made it work! There are far more DIY elements now:
Inspiration Curtains

W.'s Curtains

Inspiration Dresser


W.s wall:
Here is what we did:
-I striped the walls vertically to look like the Better Homes and Garden's picture.
-I added a third swag to the window treatments so I could use them in his room at this house and didn't have to throw them away!
-I made a cushion for the top of his toy box to look like the window seat in the BH&G picture. I purchased the foam with a 1/2 off coupon from Joann's as well as the trim and used scrap fabric.
-I found a trundle bed on Craigslist that was in great shape and painted it black.
-I bought the desk from the woman that sold us our house for $50. It is a good, solid piece of furniture. I painted it black, painted the hardware gold (because there seems to be no hardware in existence that is the same size as the original) and used nail heads to attach grosgrain to the top.
-The desk chair was an antique from my husband's Grandfather's house and the rocking chair was my husband's father's when he was a child.
-I bought the map at the cutest store in Birmingham, but I can't remember the name! It is high-end wrapping paper, so it was only $3.50!
-The carpet, dresser, mirror and window treatments were from the original house.
-We've got all original artwork in W.'s room: a watercolor that my mother painted, a print that my aunt purchased at an estate sale and a print from Monticello.
I still have a few more projects in W.'s room before the next baby like making shams for his bed and buying a few more maps for his wall, but I think it is almost finished.
xo-
Carson
Here is the picture from Better Homes & Gardens that I used as my designer template:
Here are the pictures from W.'s original nursery:
Okay, I was just beginning my path as a DIYer back then, and I hate to admit that I BOUGHT, yes bought when I could have easily done this myself, this beautiful dresser. I know better now!

You DIYers will LOVE this. Once upon a time, I was betrothed to another other than my husband. When the first engagement was called off, I had already purchased my dress. It hung in my closet for years. I was working on the window treatments for the nursery and wondering what I should do for a bed-skirt and, "ah-ha!" I remembered my dress. I cute it up and attached to a rectangular square and Voila, a lovely bed- skirt!


For W's original nursery, I bought than I ever would now, that is, now that I'm a seasoned DIYer. I purchased the dresser, crib and rug new.
Here are the DIY elements:
- The initials above the bed, which I sprayed painted and hung with decorative ribbon and furniture knobs.
- The window treatments which I made from a pattern. I splurged on the trim, but purchased the fabric and lining during one of Joann's 50% off sales.
- I made the bed-skirt from an old wedding dress (from my broken engagement!)
- The shelf is from Ben Franklin crafts and is spray painted.
- The rocking chair is a Hampden-Sydney rocking chair given to us by my parents. (My husband is an alum too!), and I covered the cushions that came with it with left-over fabric from my curtains.
- My friend was taking the side table to the dump when I pulled it from his truck. I sanded and painted it.
- The shelf is a collection of silver and memorabilia.
- We striped the walls.
Here is W.'s room at our new house. I tried to keep the same look. The most difficult project was that I saved the curtains from our first house and added a third swag so they would fit the new room. I was shocked that I actually made it work! There are far more DIY elements now:
Inspiration Curtains
W.'s Curtains

Inspiration Dresser
Our Dresser
W.'s window seat:
Inspiration Wall Stripes
W.s wall:
Here is what we did:
-I striped the walls vertically to look like the Better Homes and Garden's picture.
-I added a third swag to the window treatments so I could use them in his room at this house and didn't have to throw them away!
-I made a cushion for the top of his toy box to look like the window seat in the BH&G picture. I purchased the foam with a 1/2 off coupon from Joann's as well as the trim and used scrap fabric.
-I found a trundle bed on Craigslist that was in great shape and painted it black.
-I bought the desk from the woman that sold us our house for $50. It is a good, solid piece of furniture. I painted it black, painted the hardware gold (because there seems to be no hardware in existence that is the same size as the original) and used nail heads to attach grosgrain to the top.
-The desk chair was an antique from my husband's Grandfather's house and the rocking chair was my husband's father's when he was a child.
-I bought the map at the cutest store in Birmingham, but I can't remember the name! It is high-end wrapping paper, so it was only $3.50!
-The carpet, dresser, mirror and window treatments were from the original house.
-We've got all original artwork in W.'s room: a watercolor that my mother painted, a print that my aunt purchased at an estate sale and a print from Monticello.
I still have a few more projects in W.'s room before the next baby like making shams for his bed and buying a few more maps for his wall, but I think it is almost finished.
xo-
Carson
Subscribe to:
Posts (Atom)


