
I picked up some swatches of other fabrics so I could start thinking about pillows and the ottoman I plan on recovering:

You may be thinking: what is the difference between "faux" and "real" Roman shades? Faux Roman shades only look like Roman shades; however, they are inoperable. I'm going to place the shades above windows in our downstairs family room that already have wooden blinds, so my Roman shades will be purely decorative. There are two sets of double window and a single window, so I'll be making 5 shades.


I was able to find some other blogs that describe how to make faux Roman Shades:
My Favorite DIY blog Centsational Girl made this cute faux shade for her laundry room:

Like these from Fly Through My Window


Fly Through My Window combines sewing and gluing and High Heeled Foot Through the Door uses only glue. I'm going to sew the entire curtain, but am going to incorporate techniques from a variety of sources. Whether you are a seamstress, the variations on this project in the above tutorials make it accessible to even the most unseasoned DIYer.
Here's What I Did to Make Faux Roman Shades, or Fixed Roman Shades:
________________________________________________________________________
Supplies I used:
cutting mat
scissors
pins and needles
sewing machine, thread and other basic sewing tools
measuring tape
staple gun
1 x 2 inch boards (1 board 38 inches wide, and 4 boards 37 1/2 inches wide)
10, 1 1/2 inch L-brackets
electric drill
Supplies I used:
cutting mat
scissors
pins and needles
sewing machine, thread and other basic sewing tools
measuring tape
staple gun
1 x 2 inch boards (1 board 38 inches wide, and 4 boards 37 1/2 inches wide)
10, 1 1/2 inch L-brackets
electric drill
FRIDAY
1. Purchasing the fabric: I have five windows, and to be safe, I purchased one yard of fabric per window. The windows are 38 inches wide, so home decor fabric, which normally measures 54 inches wide, will be more than ample.
TIP: My Ikat fabric is linen and not stiff. So, I chose a liner fabric that was stiff because I knew that I wanted crisp pleats in my shade. I want stiff lines and not a loose, casual look. The fabric I bought may not be curtain liner, per se, but it was the right color, price and material.
TIP: My Ikat fabric is linen and not stiff. So, I chose a liner fabric that was stiff because I knew that I wanted crisp pleats in my shade. I want stiff lines and not a loose, casual look. The fabric I bought may not be curtain liner, per se, but it was the right color, price and material.
2. First I cut the selvages from my fabric, then played around with how I wanted the folds to look. I measured the window and decided how long I wanted the fabric to hand down--about 18 inches from where I will mount it. I don't want much overlap between my Roman Shades and my wood blinds as I want to maximize the sunlight coming into this room. You'll need a general idea of how big your fold with be (and how much fabric will fold behind your shade) before you cut out the fabric. If you are going to make shades for multiple windows, it would probably be a good idea to figure you measurements in advance.
3. Next, I cut out 5 separate curtains and 5 separate linings. If you are using solid fabric, this process is much simpler, but I had a busy patterned fabric; therefore, it was necessary to cut all the curtains so that the pattern was identical on each. I knew that my fabric was irregular, which is why it was at the discount fabric store, but I thought the issue was with only the selvages. Much to my dismay, I found that the pattern was printed crookedly--ugh! I would go into detail, but the details and boring and painful. Cutting out patterned fabric that is printed crooked made the simple task of cutting the 5 separate piece quite difficult. In my case, there was more pressure as the shades will hand side-by-side, so the pattern must line-up exactly. This step took about 2-3 hours.


I used the first piece of fabric that I had cut out as a guide to cut the subsequent pieces. I had measured and cut the first piece making sure it was straight and rather than do this again with each subsequent piece, I simply used the first piece as a pattern--lining up the design underneath it.


SATURDAY
3. First, I pinned the liner to the fabric. You want wrong sides together in this step. I pinned all 5 shades.
TIP: Be sure to iron your fabric first. I skipped this step only realized it once I was sewing the pieces together.

4. Next, sew all four sides together on each curtain using a 1/2 inch seam allowance. This seam will not be visible in the finished shades so use whatever color thread you'd like. I'd recommend something bright or at least, contrasting to the white. It is merely to help hold the shade and liner together during the sewing process.

6. My shades will be 38 wide, but I allowed for a 1 each seam on each side; therefore, I cut my fabric 40 inches wide. Once my shade and liner were sewn together, I folded every side, except the top, 1/2 inch, that is, I folded the right, left side and bottom sides. You won't need to measure this. If you stitched together the shade and liner with a 1/2 inch seam, you should just fold the shade on this line. Press.

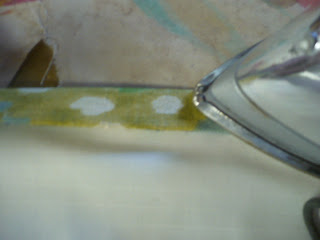
Iron it down as you go.. I did this on on each shade. Leave the top (where it will be mounted to the board) alone. No folding on the top.
Then on only the left and right sides of the shades, I folded another 1/2 inch, ironed and pinned it. At this point, my shade was 38 inches wide, because I had folded an inch on each side.


I did not make a second fold on the bottom of the shade, but pinned the original 1/2 fold.
7. This is what your shade should look like--one the backside--at this point. The right and left sides have been folded 1/2 inch, pressed, folded another 1/2 inch and pinned. The bottom has been fold 1/2 inch, pressed and pinned. The top has not been folded.


7. Next, I decided to create the bottom hem. I folded the bottom of the shade up 2 inches and pinned it. I had much internal debate as to whether I should stitch, by hand, the right, left and bottom hems or use the machine. I decided to hand stitch them all. But, if you can use your machine, you will save a ton of time. Since these were going to hang in my family room and not a laundry room or bedroom, I thought it best to take the time to hide the hems by hand-stitching.

See my two-inch hem, below:
TIP: Though I was using a blind stitch (I think that is what it is called), I would push through to the front of the fabric bringing the stitch all the way through to the back every once in a while. I wanted to be sure the front fabric and the liner were connected. I was using a coordinating thread, so this front to back stitch was imperceptible.
8. Next, I hand stitched the left and right sides of the curtain.
9. Then I started measuring for the pleats. If I were only doing one window, I would totally eye-ball this and not bother measuring, but, since I will have 5 treatments hanging side by side, the pattern and pleats must line-up and match.
 10. Initially, I created a curtain with 3 folds, but wasn't sure I liked it, so I sewed a second with 2 folds (and one hem) and liked the second better. I ripped out the seams from my original and sewed it again with 2 folds, in which case, I was glad that I hand sewed instead of using the machine.

11. For my shades with 2 folds and one hem (that looks like a fold), I measured 16 inches from the top of my curtain to the bottom of my first fold. Then, I folded 3 inches behind the shade and pinned the fold.


 12. The I made another fold four inches below my first fold. This was my second fold. Now, at this point, I did not measure how much fabric I would fold behind the shade like I did with the first fold. I knew I wanted my folds to be four inches each, so I folded, behind the shade, the amount that was necessary to make my pleats all be 4 inches. I hope this makes sense!
15. The fun part: stapling the fabric to the board. I don't guess I need to explain this step. I just lined up the top of the fabric to the top of the board and put in lots of staples.


16. My husband helped with hanging the shades by attaching the L-brackets to the wall, then attaching the board/shade to the L-brackets. We mounted the shades as high as they could go, so they touched the crown molding.
3. Next, I cut out 5 separate curtains and 5 separate linings. If you are using solid fabric, this process is much simpler, but I had a busy patterned fabric; therefore, it was necessary to cut all the curtains so that the pattern was identical on each. I knew that my fabric was irregular, which is why it was at the discount fabric store, but I thought the issue was with only the selvages. Much to my dismay, I found that the pattern was printed crookedly--ugh! I would go into detail, but the details and boring and painful. Cutting out patterned fabric that is printed crooked made the simple task of cutting the 5 separate piece quite difficult. In my case, there was more pressure as the shades will hand side-by-side, so the pattern must line-up exactly. This step took about 2-3 hours.


I used the first piece of fabric that I had cut out as a guide to cut the subsequent pieces. I had measured and cut the first piece making sure it was straight and rather than do this again with each subsequent piece, I simply used the first piece as a pattern--lining up the design underneath it.


SATURDAY
3. First, I pinned the liner to the fabric. You want wrong sides together in this step. I pinned all 5 shades.
TIP: Be sure to iron your fabric first. I skipped this step only realized it once I was sewing the pieces together.

(As you can see, I tried my best to measure the shade and liner exactly, but was still a bit off. It doesn't have to be perfect--no one will know but you!)
4. Next, sew all four sides together on each curtain using a 1/2 inch seam allowance. This seam will not be visible in the finished shades so use whatever color thread you'd like. I'd recommend something bright or at least, contrasting to the white. It is merely to help hold the shade and liner together during the sewing process.

6. My shades will be 38 wide, but I allowed for a 1 each seam on each side; therefore, I cut my fabric 40 inches wide. Once my shade and liner were sewn together, I folded every side, except the top, 1/2 inch, that is, I folded the right, left side and bottom sides. You won't need to measure this. If you stitched together the shade and liner with a 1/2 inch seam, you should just fold the shade on this line. Press.

Iron it down as you go.. I did this on on each shade. Leave the top (where it will be mounted to the board) alone. No folding on the top.
Then on only the left and right sides of the shades, I folded another 1/2 inch, ironed and pinned it. At this point, my shade was 38 inches wide, because I had folded an inch on each side.


I did not make a second fold on the bottom of the shade, but pinned the original 1/2 fold.
7. This is what your shade should look like--one the backside--at this point. The right and left sides have been folded 1/2 inch, pressed, folded another 1/2 inch and pinned. The bottom has been fold 1/2 inch, pressed and pinned. The top has not been folded.


7. Next, I decided to create the bottom hem. I folded the bottom of the shade up 2 inches and pinned it. I had much internal debate as to whether I should stitch, by hand, the right, left and bottom hems or use the machine. I decided to hand stitch them all. But, if you can use your machine, you will save a ton of time. Since these were going to hang in my family room and not a laundry room or bedroom, I thought it best to take the time to hide the hems by hand-stitching.

See my two-inch hem, below:

TIP: Though I was using a blind stitch (I think that is what it is called), I would push through to the front of the fabric bringing the stitch all the way through to the back every once in a while. I wanted to be sure the front fabric and the liner were connected. I was using a coordinating thread, so this front to back stitch was imperceptible.
8. Next, I hand stitched the left and right sides of the curtain.
9. Then I started measuring for the pleats. If I were only doing one window, I would totally eye-ball this and not bother measuring, but, since I will have 5 treatments hanging side by side, the pattern and pleats must line-up and match.


11. For my shades with 2 folds and one hem (that looks like a fold), I measured 16 inches from the top of my curtain to the bottom of my first fold. Then, I folded 3 inches behind the shade and pinned the fold.


13. After my fold were pinned in place, I flipped the curtain over, to the backside, and hand stitched all the way across each fold occasionally stitching through the back to the front and back again to make sure the front fabric and liner were connected.
15. The fun part: stapling the fabric to the board. I don't guess I need to explain this step. I just lined up the top of the fabric to the top of the board and put in lots of staples.


16. My husband helped with hanging the shades by attaching the L-brackets to the wall, then attaching the board/shade to the L-brackets. We mounted the shades as high as they could go, so they touched the crown molding.


Coming soon: making simple pillows and covering an ottoman.
xo-
Carson
12 comments:
These are lovely, great job!
I'm thinking I need some of these in my house, since I already have blinds but love the look of roman shades.
Thanks for posting this !! Was wanting to do the same thing! I just came back from JC Penney's and for them to make ONE for me would coat over 700 dollars!! I told my husband I am making a faux roman shade !! I will make it just like yours !! Thanks again!
Good fabric choice....it's look make me happy..
Roman shades concord, ca
Beautiful job!
Valuable roman shades information for all the people. I am sure readers will love it and probably share it with their loved ones and friends.
You can choose between faux roman shades ot fixed roman shades, useful post
Nice. But I think you ironed it too much. It looks stiff in the photos. Anyway, they’d loosen up after a few days. Also, I think it’s a lot better if you place them a little lower, like in Centsational Girl’s blog. =) Thanks for sharing! =) Roxie @ WindowTreatmentsPhiladelphia.com
Wow! The end result looks really gorgeous! First of all, can I just say that I love your choice of fabric as it definitely has a great print to it. Second, I think you gave really clear and good details of the procedure, which make doing it seem like a breeze. Thanks!
Greg Arnett
Faux roman shades or fixed roman shades are described here. Get details from here. window shade houston tx. The article has shared relevant information about it.
I love roman shade blinds. Your stuff is very interesting.
Roman Blinds
Hello man! Incredible post however I extremely needed to simply drop a remark on your blog. Your blog has a super cool outline. Is this wordpress by possibility?
hotel curtains abu dhabi
Great tutorial! Thanks for sharing your DIY journey with us.
Post a Comment