Monday, December 31, 2012

DIY Jellyfish Halloween Costume


About a year ago, my 4 year-old-son became obsessed with the deadly box jellyfish which is native to Australia.  We read, and re-read, the book from the library.  We watched documentaries.  Everything was jellyfish.  He decided that he wanted to be one for Halloween, and though that was about 9 months before Halloween, he did not change his mind.  So, I assumed the task trying to create a jellyfish costume.  I did find a tutorial here, which was incredibly helpful. I made some adjustments and, I think, was able to make it with fewer supplies.

Here are the supplies:

A Sombrero from Party City
Spray Paint  (I used metallic which I already had)
Small bubble Bubble Wrap
Large bubble Bubble Wrap
Shiny, iridescent, see-through fabric (1 yard)
white streamers
4 small touch LED lights from Target and batteries
foam board
glue gun or regular glue
scissors
pencil

1.  First I spray painted the sombrero with metallic spray paint that I already had.  I think you could use white or pearl--whatever would cover the colorful stitching.

2.  Next I put the sombrero on top of a piece of foam board.  I traced around the bottom of the sombrero with a pencil and tried to trace under the area where one's head goes.  Basically you will draw what looks like a toilet seat.  Then using scissors I cut out the toilet-seat patterned foam board.

3.  Using a glue gun, I glued the foam board to the top of the sombrero.


4.  Next, cut a section of the small bubble bubble wrap and folded it in half then wound it around the edge of the hat gluing it to the top and the bottom.


5.  Then, I continued to wind the bubble wrap around the sombrero gluing it as I went.  I tried to keep it full and "fluffy" looking.


6.  I forgot to take any more pictures after this point!  I kept adding bubble wrap and glued it to the bubble wrap already there.  I had to go to the store to buy more bubble wrap to make it fuller looking so, I added large bubble bubble wrap the second time.  Once I had a nice "bell" on the jellyfish.  I took one yard of iridescent fabric and put it over the bell gluing the fabric to the bottom of the sombrero--I left some spots unglued under the brim (that is, I didn't glue the fabric completely around the bottom), so I could get my hand into the sombrero to add the LED lights.

7. Lastly, I glued white streamers to the bottom of the hat.

*Note:   The adult sombrero was too large for my 5 year-old.  I might have thought of a better idea had I not waited until the last minute, but I had him put-on a baseball cap before putting on the sombrero.  That helped, but I still had to lightly hold the back when he walked.


Thanks for reading!
Carson

Tuesday, September 18, 2012

How to Make a Roman Shade from a Curtain (with or without a sewing machine)


It has been some time since I made these shades, but writing the tutorial has been tough!  So here goes:

I wanted Roman shades for my living room, and was inspired by this photo:
bathroom window treatments


Let me begin by saying that if you make these shades without trim, you can make these without a sewing machine.  You would have to sew one of the sides by hand, but that is all you would need to sew (aside from attaching the rings)!  Attaching trim is more complicated.  I used a sewing machine.  You could do this by hand, but it would take a lot of time and patience.


One of my favorite DIY curtain-making tricks is to transform a pre-made curtain panel into a different type of window treatment.  I did this in our family room makeover taking white panels--which I bought for $10 a piece at Lowe's--and turning them into pleated valances.  You can see this project here.  I decided to to this again for my Roman shades this time using lined panels from JC Penny's.  I do this for several reasons:  1.) It is economical as you can get a lined panel for about $30; you would be hard pressed to buy the fabric separately--lining and front fabric--for that price.  2.) Most of the measuring has been done for you thus simplifying the process.  3) You won't need to hem the curtain because that has been done for you as well.  4) I didn't know it at the time, but the light-weight black-out lining that was fused to the front of the fabric makes nice folds.  You will still have to "train" these shades a bit, but they will look pretty good from the get-go.

The first thing you want to do is gain an understanding of how Roman shades work.  I watched these tutorials by Terrell Designs which are available on You Tube.   Even though I am not making mine exactly as she does, I found these videos useful. 

Next comes measuring.  You will need to know how long and wide you want the finished shade to be.  You will need to take into consideration whether you'd like your shade to be an inside or outside mount.  (Watching the videos and reading the website by Terrell Designs might be helpful if you aren't sure.)

I decided on outside mount shades to cover my molding.  The finished shades would be 40 inches wide and 72  inches long.  My seam allowances will be 1/2 inch.   So, I purchased a curtain that is larger than my finished shade would be.  I bought this one from JC Penney's:  Linden Street Ellis Thermal Rod Pocket Panel in Cool White 42 x 84 inches.

Here is how I transformed my curtain to a Roman Shade:

Supplies:

  • pre-made curtain panel
  • trim, optional*
  • pins
  • scissors
  • measuring tape
  • sewing machine (if attaching trim)*
  • needle for hand-sewing
  • 2 x 1 inch board (It will really be 1 1/2 x 1) cut the desired length of shade 
  • 3/4 inch plastic rings, found in the curtain making section at a craft store like Joanne's
  • staple gun and staples
  • hammer
  • thin dow rod that is almost as wide as your curtain
  • screw eyes
  • cord for your shades, also found in the curtain making section at a craft store like Joanne's
  • tools and hardware to mount the shades: l-brackets, screw diver and screws
*These Roman shades can be hand-sewn (I truly think a beginner could do this) if you choose not to attach trim.  I use my sewing machine on this project only to attach trim, and sewed the one side seam by hand.

1.  First I measured the size that I wanted the finished shade to be: 40 inches wide x 72 inches long.

2.  I purchased a panel curtain from J.C. Penney's that is bigger than the size (42 inches wide by 84 inches long) of what the finished Roman shade would be.

3. I cut-off the tab top as close to the seam as possible.


Now, here is what surprised me.  I found that the lining was fused to the front fabric; that is, the lining and the front fabric were not separate pieces of fabric as is standard in lined curtains, so I had to change my plan a bit.  I was worried that the finished result might not look quite as professional as I had hoped because some of the stitching would be visible on the backside of the curtain and would not be covered, which a separate piece of fabric lining would have hidden.  However,  I decided to risk-it happy in the fact that the curtains would be much simpler to make.  This tutorial is based on these specific curtains from J. C. Penney's.

4. Next, I turned-under one side of my curtain until the front of my curtain was 40 inches wide.  I used pins to hold the curtain in place so that it was 40 inches wide. Pin the entire side of the curtain under so that you curtain is the desired width.


Tip:  You don't need to measure all the way across your curtain each time.  Once I used the measuring tape a few times to ensure that my first few pins made the shade 40 inches across/wide, I determined that the curtain should be folded under 2 1/2 inches, so I continued pinning the curtain by making the fold 2 1/2 inches.

5.  After I pinned the entire side of my shade, I hand-stitched a blind hem stitch to attach the fold.  Click here to see a tutorial on how to make a blind hem stitch.  I stitched all the way down the side, but stopped just short of the bottom.  I stopped my stitches before I got the factory/pre-made hem on the panel.  I decided that I would insert a small dowel rod (because I had a few in my workroom) here after I attached the trim and would finish the stitching at that point.  The dowel rod is optional, but I think it helped to give the shade some weight.

Hand stitching:


6.  Then I attached the grosgrain ribbon.


I will be honest and tell you that this did require a good bit of time and patience!  If you are making this shade without trim, skip to step #7.  (Also, I have never tried this, but if you don't want to use a sewing machine but still want trim, you could perhaps use fabric glue to attach your grosgrain.) 

First, I made a sketch of the design.  Then I unrolled my grosgrain and pinned it to the curtain.  I takes patience and lots of measuring to make the "key" at the bottom; however, patience and proper measurements are even more important when you try to match the key on the other side of the curtain.  After I was finished pinning, I used my sewing machine to sew the ribbon to the curtain.  I was worried that this might look unseemly from the backside since there was not a separate lining to cover it, but my thread was a light taupe which is hardly noticeable.

If the key trim looks daunting,you could attach trim straight across the bottom or line the sides and bottom in a rectangle design making it much simpler.  See my box pleat valance tutorial to see the "straight across" look.

Note: I was making two matching Roman shades and left the first, completed curtain lying on the floor so that when I made the second, so I could pull my measurements directly from the first curtain.

7.  Time to attach the rings.  This also takes a good bit of time to figure out what to do and then do it.  I believe it took about 3 hours to sew the rings on each shade.  You will need to determine how many folds you want.  I knew that I wanted my ribbon or "key" design to show even when the shade was drawn, so I had to take this into consideration.  (Watching the You Tube tutorials by Terrell Designs certainly helped me with this.)   A good way to think of the folds is as "flaps."

I will do my best to explain how to make the flaps:  The rings are attached to every other flap or the "up" part of the fold.  So, for my shades, the first measurement that I determine was the distance from the bottom of the shade to my first row of rings which would create my first flap. I wanted my key design to show, so I decided to make my first row of rings at 14 inches.

The made the subsequent rows every 14 inches.  In total, I had 6 rows of rings.  The flaps are created between your rows of rings--the rings pull the curtain up creating the flap..  So, I had four flaps.

I hand-sewed 5 rings on each row.  Make sure you sew rings close to the edges them evenly space the remaining rings.  Also, make sure you go all the way through the fabric and that your thread is the same color as your curtain.

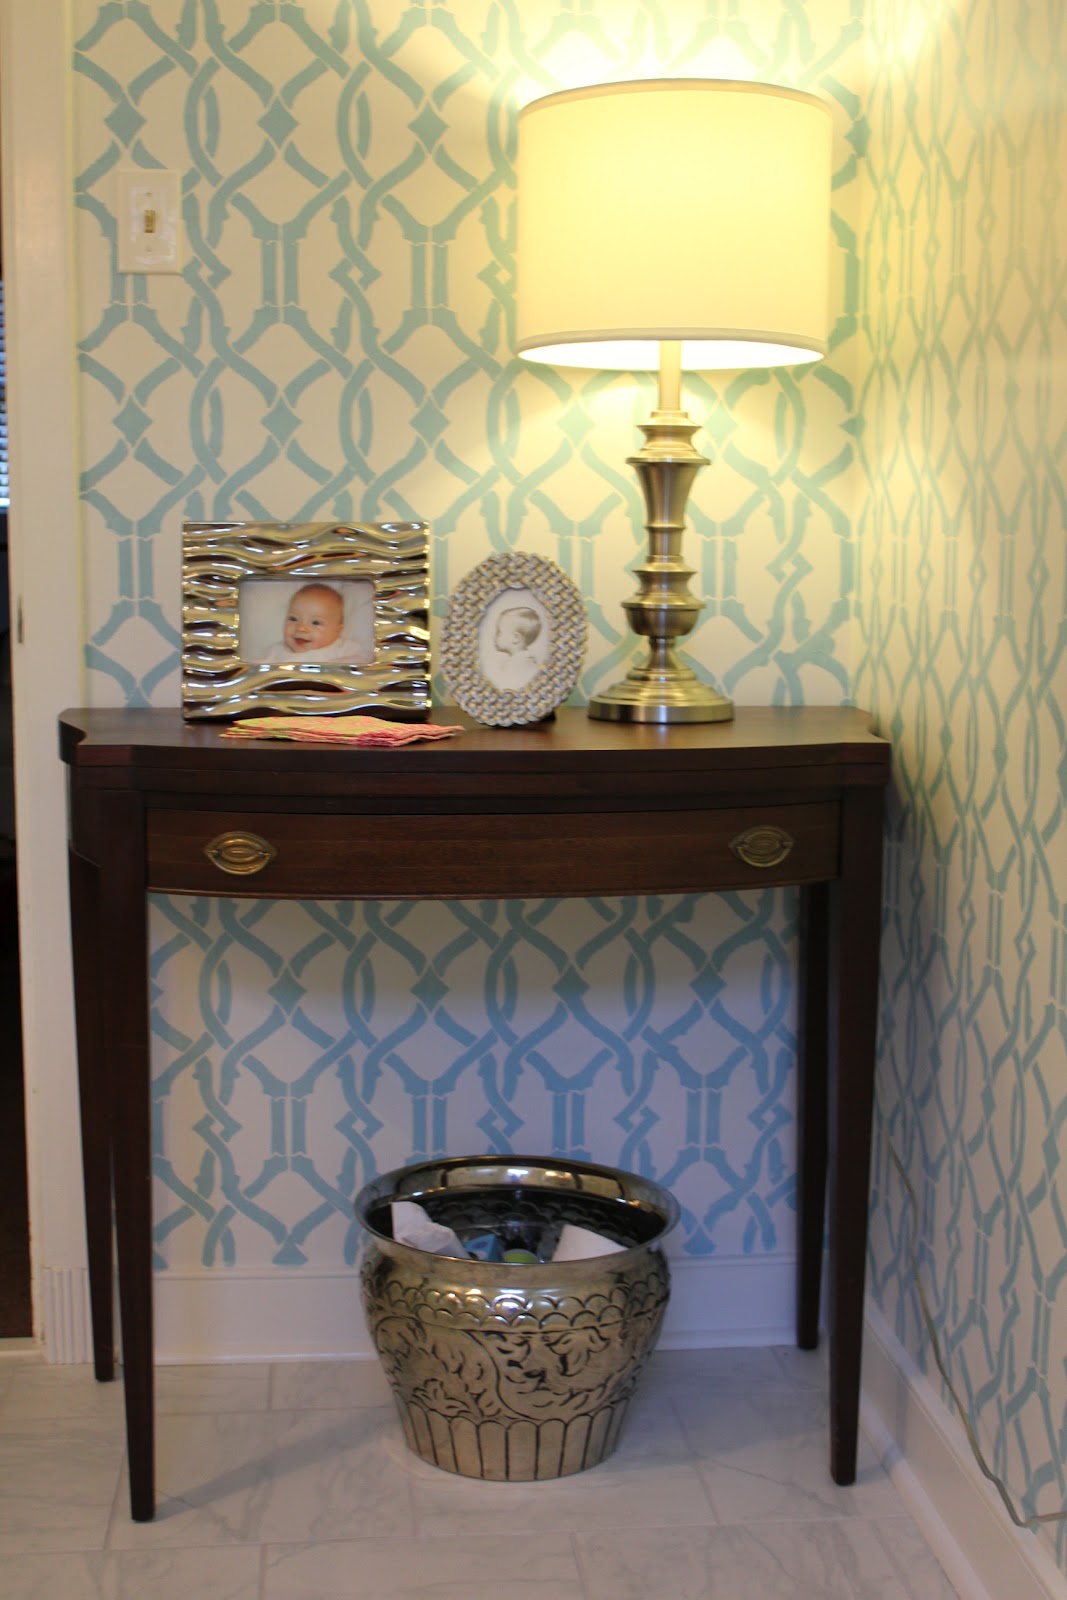
 I also decided that I wanted a longer section of fabric at the top of the shade like my inspiration picture:


bathroom window treatments

8.  Now you will attach the shade to your board.  Make sure your shade is straight and centered.  Use your staple gun and start by stapling a center staple and working out to the sides. I made my curtain so it was longer than my desired finished length, so at this point, I pulled the excess fabric to the back (over the board), and I measured to make sure my shade was my desired finished length. After I stapled the fabric to the board, I cut-off the excess fabric.  (See pictures below):


Alternately, I suppose you could glue your shade with super-glue though I've never tried this myself.

9.  Now it is time to attach the screw-eyes.  Each of my rows has 5 rings--so you'll need one screw eye for each ring.  On your board--keeping in line with each column of rings--you'll screw the screw-eyes into the board.  Just used your hands at first.  When it becomes to hard to twist them, use a tool, like a screwdriver, to twist them into the board.


10.  After attaching your shade to your board, you will need to add your cording.  I think the project starts getting fun at this point, because the end is in sight.  I may even have been giddy when attaching the cording!  I'm sorry to say that I didn't keep the packaging for the cording, so I don't remember the size or length needed.  It was Wright's from Joanne's and that is about all I can remember.


Tie the cord around the first ring on the first row.  Make several knots to make sure it is secure.  Thread the cording through the column of rings above until you get to the screw eye.  At this point, you'll need to decide on what side you want your "pull cords."  Let's say you choose the left.  Take the cord through any of the screw eyes on the board to the left.  Repeat this with every column of rings.  In the end, you should have all your extra cording dangling from the last screw-eye on the left.

11.  Now it is time to mount your shade to the wall.  My husband did this, so I'm afraid I can't give you any tips.  He used l-brackets and a drill and that's about all I know.


11.  Last things:
*You may need to hand-stitch the hem-where your rod is inserted--closed.  I didn't, but you could.
*Play around with your shade.  Trim any extra cording.  You can add plastic ends to your cording.
*If you have children, read about how to prevent strangulation from Roman shades.

I hope I didn't leave out anything.  Good luck!
Carson

Sunday, July 15, 2012

Open-Faced Maitake Mushroom Sandwich


Yesterday was my normal Saturday morning at the farmers' market.  We had planned on attending a concert that evening and taking a picnic, so I decide that I would see what looked good at the market and let availability determine the night's menu.  I came across some great looking specialty mushrooms and decided that I would make mushroom sandwiches modeled after mushroom crostini recipes that I had seen. The farmer, if you will, helped me narrow the selection to bright yellow Oyster or brown Maitake; I went with the latter after he described the flavors.  I knew I had shallots at home, so I purchased a freshly made baguette and cracked pepper goat cheese before leaving the market. Well, it rained and stormed on and off all day, and we ended up seeing a movie instead of going to our concert.  So, I made these for lunch today:

Open Face Maitake Mushroom Sandwich

Ingredients (all are approximations):
  •  3-5 TB butter
  • 1 lb Maitake mushrooms, coarsely chopped
  • 1/4 cup shallots, finely chopped
  • 2 cloves garlic, minced 
  • thyme and chives from herb garden
  • salt and pepper
  • cracked pepper goat cheese
  • fresh baguette, sliced
First, prepare all the ingredients as described above.

 Melt a few tablespoons of butter in a saute pan on medium high heat.  Cook the shallots until they begin to soften.  Add the garlic and cook for about 30 seconds. 

Then add the mushrooms.  Season generously with salt and pepper and stir  continuously. 

You will probably want to add several more tablespoons of butter at this point.   Throw in some herbs.  Cook until the mushrooms are soft.  Turn off the heat and let the mushrooms mixture sit in the pan.   Meanwhile, spread your goat cheese on top of your bread slices and toast. 

Top with mushroom mixture and serve immediately.

 Bon Appetit!
Carson


Saturday, June 2, 2012

How to Stencil a Room / Powder Room Remodel


I'm excited to share our powder room remodel!  I've lived with the old powder room for four long years and shed nary a tear to see it demolished; in fact, it has been my favorite renovation in this house.  First--with some embarrassment--I shall reveal pictures of the old powder room.  Brace yourself:


With some help from my friend Kim, we decided that the makeover needed to make the bathroom look clean and fresh.  We decided on white, well, just about everything.  White pedestal sink, toilet (of course), white walls and trim and white and grey marble.  I picked up these scones from Restoration Hardware:


Inspired by these rooms, I pondered wallpaper:


I loved the look, but the cost and trouble of putting up (and removing) wallpaper made me look to another option: stencil.  I found really cool stencils from Cutting Edge Stencils.  There are so many choices that I couldn't decide, so I deferred to my friend who chose the Iron Gate Stencil, pictured here:


I never would have picked this pattern though now that I've used it, I'm not sure why.  It can probably be chalked-up to the fact that I don't love this color combination pictured on the website.  Our contractor, Matt ( owner of The Living Wood Workshop) had begun the renovation before I even ordered the stencil, and at that point, I had no idea what color I would use.

Pictures of the renovation:

 (Above: Bye-Bye 80's toilet and sink!)

 (Above: Wow--layers of wallpaper and the discovery that the person who had previously done work on the home used speaker wire to wire the light fixture!)
(Above: Dated tile ceiling with water damage.)

I'd like to share with you what I did to the walls.  Matt suggested painting over the existing wallpaper.  He reasoned that it had been professionally hung and was in good shape without many nicks or tears and that the crown molding would cover the top area, so that painting over it would be easiest than trying to remove it.  He said I would have to prime it, cut out bubbled or problem areas and then mud over (using pre-mixed joint compound) the places where I had removed the wallpaper. I had always heard that painting over wallpaper was not a good idea, but ultimately that is what I decided to do.  Things, however, rarely go as planned during a renovation.  After he removed the vanity and toilet, I began priming the wallpaper on the wall that had held the toilet, sink, mirror and lights; however, once I applied the Kilz, the wallpaper started to pull off in sections since there was far more damage to the wallpaper on that wall.  I ended up removing the wallpaper on only that wall and leaving alone the other three.

After the wallpaper was down, I sanded and mudded (with pre-mixed join compound) the wall.  I spent a lot of time on these steps, so the wall would be smooth.  I also mudded and sanded the other three walls which still had wallpaper in order to repair the places where the wallpaper was not smooth.  When I felt that it was as good as I could get it, I primed all four walls with white Kilz primer.  I put on at least two coats on the bare wall and 3 coats on the walls with wallpaper.  Then I put two coats of white ("Decorator's White" by Benjamin Moore) on all the walls.  I painted Benjamin Moore Ceiling White on the ceiling.  Oh, I had to prime the ceiling too.

By the time I had finished all the painting, the stencil had arrived.  Now I'll give you some tips that I learned while stenciling a room using a stencil from Cutting Edge Stencils:

First, let me say that Cutting Edge Stencils does a good job of providing tips and how-to videos.  Before you use one of their stencils, you should make yourself familiar with the instructional information that they've provided.

First, I primed and painted the wall's Benjamin Moore Decorator's White taking great pains with the prep work.
Second, I covered the floor with plastic drop clothes and used painter's tape to tape the plastic to the walls.  I put lamps on the floor for better lighting and got all my supplies ready.  I used a pan and a high -density small foam roller to roll the paint onto the stencil, and I used painter's tape to tape the stencil to the wall.  The color I used for the stencil was my left-over paint from my desk project, which is Benjamin Moore Blue Rapids.

Then I began stenciling.  I started on one of the least prominent walls--next to the door into the room.  I used painter's tape to stick the stencils to the wall.  (I wouldn't recommend a spray adhesive.)  As you can see, the stencils does not go to the top of wall, that is, it doesn't butt-up against the molding.  Don't worry, Cutting Edge Stencils sends an additional smaller stencils for these areas.


The project looks intimidating, and it isn't exactly easy, but it is probably not as difficult as you might think. (I will admit, that I was not a stencil novice; I had stenciled our front hall.) My stencils became crooked as I worked my way around the room, but I don't think anyone can tell.  That is the beauty of a really busy stencils: people don't notice the mistakes.  The stencils interlocks with itself, so there is no measuring involved!

 (Above: crooked stencil--but who can tell?!)

Working on the corner which is the most difficult part.

So....I slowly made my way around the room.  The corners are the most difficult part.  On the Cutting Edge Stencils website, they show you how to do corners, but I would recommend something different.  If I could go back and do this project again, I would have skipped the corners and hard to reach spots and done them last.  I figured this out near the end and saved some hard to reach spaces--like behind the sink--for the end.  If you save these areas, you can cut your stencil making it much smaller and easier to handle.  It is difficult to bend the huge stencil into a right angle for the corners.

As they tell you on the website, you will have to wash your stencils every once in a while.  This is a major pain.  You must be extremely careful because the stencils can rip if you are too rough with it.  You should use a cutting  board or something flat to lay the stencil on when you rinse it.  After I washed my stencils, I would lay it on a towel and gently blot it dry and leave it for a bit to air dry, which was a good time for a break.

(Above: working on a corner with my stencil cut in half.)

(Above: working with my cut stencil in the small area behind the sink.)

After I made my way completely around the room, I cut my stencil and went back to do some of the corners and hard to reach spots as shown above.  Then I took the small extra stencils that I had received from Cutting Edge Stencils to do the areas close to the moldings.  I don't have any pictures of  the small stencil--sorry.
The small stencil certainly helped bring the pattern closer to the moldings, but it did not make the pattern touch the molding.  It was always my idea to make the stencil look like wallpaper, in which case, the pattern would need to touch the moldings.  So, I used a small, flat artist brush and painted these areas by hand.


 (Above: you can see where the pattern stops short of the molding under the window.)
 (Above: I used a small, flat artist brush to paint the pattern to the molding)
 (Above: my free-hand work is not perfect, but I doubt anyone using the bathroom notices!)


Here is the finished bathroom:


I'm not quite finished decorating though.  I'd like to paint the mirror a fun color--maybe coral?--and get a cute area rug, but it's mostly finished.  Phew.

Thanks for reading!
Carson